Ruby is a dynamic, object-oriented, general-purpose programming language that features automatic memory management and supports multiple programming paradigms, including functional, procedural, and object-oriented programming. It has a simple and expressive syntax allows developers to write code quickly and efficiently.
Ruby is mainly used for web development, particularly in developing server-side applications and frameworks like Ruby on Rails. It can also create desktop applications, mobile apps, and scripting tasks. Ruby’s popularity has grown due to its ease of use, flexibility, and availability of many libraries and frameworks. It is often used in startups and agile development environments, where rapid prototyping and iteration are critical.
RubyInstaller is a software package for Microsoft Windows that provides a self-contained installation of the Ruby programming language, including the Ruby language interpreter, development tools, and libraries. It is designed to make it easy for developers to install Ruby on their Windows machines and develop Ruby applications quickly.
The RubyInstaller includes a precompiled version of the Ruby interpreter and many libraries and tools commonly used in Ruby development, such as the RubyGems package manager and the Bundler dependency management tool. The installer also includes many development tools, such as the Ruby Development Kit (DevKit), which provides development tools and libraries that allow developers to build native C/C++ extensions for Ruby.
Step 1 – Download the RubyInstaller
Open your browser and head over to the RubyInstaller downloads page.
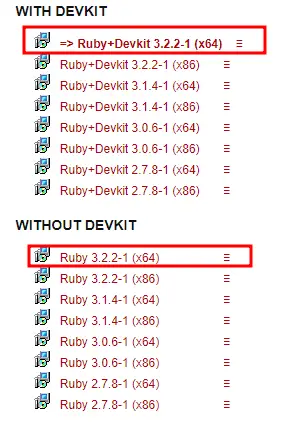
You will find two options on the downloads page: one with DevKit and the other without a DevKit.
If you want to use the system for developing software, ensure to include the Ruby version with a DevKit; otherwise, if you are only interested in the Ruby interpreter, select the one without.
Step 2 – Launch the Installer
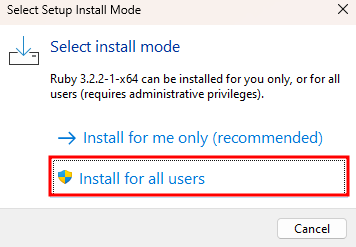
Once the download is complete, double-click to open the installer program. This may prompt you whether you wish to install Ruby for you or all accounts in the system.
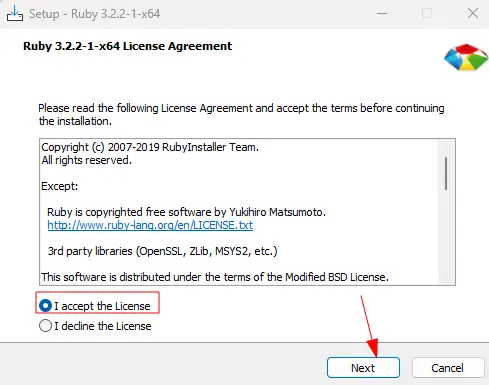
In the next step, accept the License and click Next to proceed.
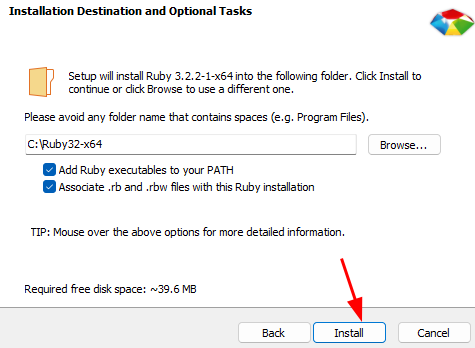
Next, configure the destination directory. Once satisfied with the configuration options, click Install to setup Ruby on your machine.
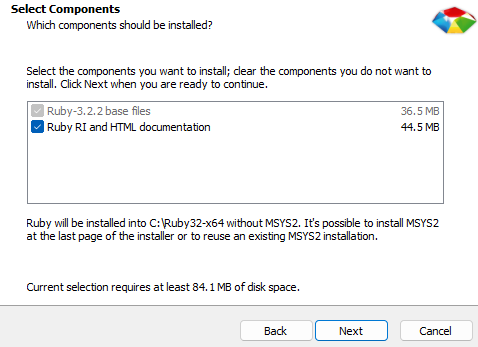
In the Components page, choose the target components you wish to install or skip.
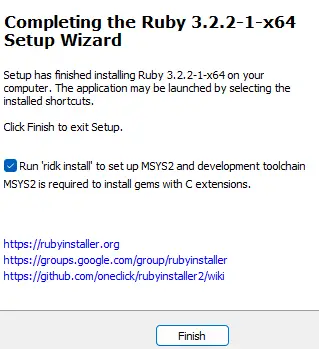
Once the installation is complete, the installer may require you to install the MSYS2 Package.
Select the option and click Finish.
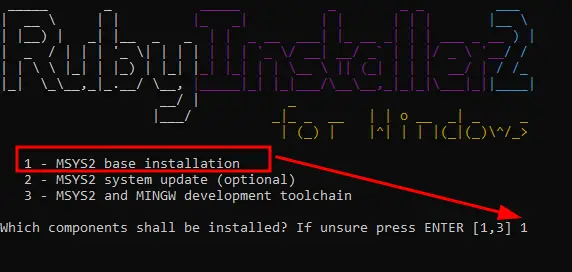
In the Prompt window, choose the MSYS2 Base Installation to configure and set up MSYS2 on your system. The best just hit ENTER (witch installing the number 3rd option) or choose the number 1 option.
What is MSYS2?
MSYS2 is a collection of software packages for Microsoft Windows that provides a Unix-like environment for the development and execution of command-line applications and scripts. It is designed to provide a full-featured POSIX environment on Windows, including a bash shell, GNU utilities, and other development tools commonly found on Unix-like operating systems.
Wait for the process to complete, and you should set up the Ruby interpreter on your system.
Step 3 – Install IDE
It will sound funny, but this will be the hardest part. The problem is not with the installer, but the search for the right IDE. I can mostly recommend Atom and Komodo IDE.