In this tutorial we will learn how to create facial hair for our character using 3ds max hair and fur modifier. This modifier gives you the freedom to create realistic hair and fur for your projects which I could say is fantastic. There is few more ways to add hair for your characters but this is more hassle free once you get to understand it.
Step 1
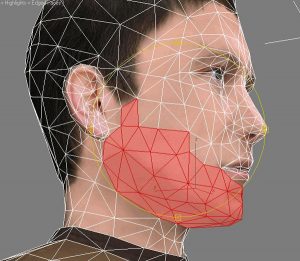
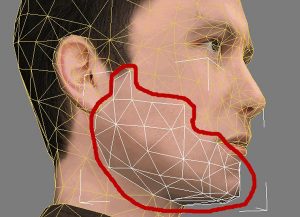
Fire up your 3ds max and bring the character you want to experiment. Since this is about to create facial hair for our character, so you have to select the faces where you want to grow hair from the face area. You could see I have selected the faces where I want to grow hair from his face.
Step 2
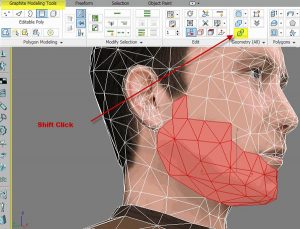
It’s time to detach the selected faces to have more control over the selected polygons, to bring them to the right shape by moving its vertices. Now with polygon still selected from your ribbon or from editable poly option hit detach.
Step 3
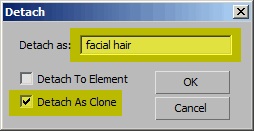
From the detach pop-up do as in the image showing below.
Step 4
Now as you can see we have copy of our detached polygons.
Step 5
With new detached polygons, go to vertex mode and refine the edges to represent smooth surface to grow believable hair from detached polygons.

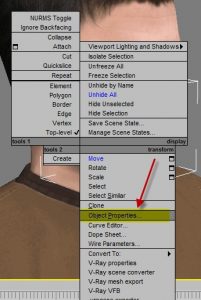
Step 6
Still with detached polygons, right click and choose “object properties”.
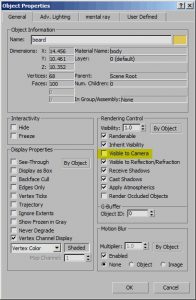
Step 7
Now from the object properties uncheck “visible to camera” and this will help us to hide detached surface from render.
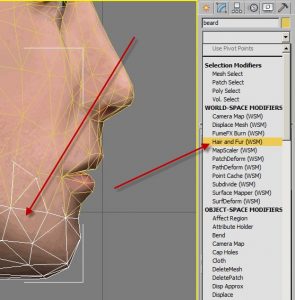
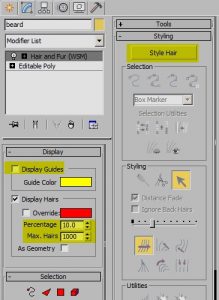
Step 8
It’s time to create our hair around the detached polygon faces, with detached polygons. Select it from modify panel drop down menu and choose “Hair and Fur” as show in the image below.
Step 9
We will see the hair is visible now around the surface we selected.
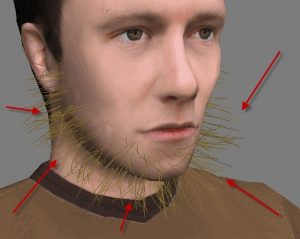
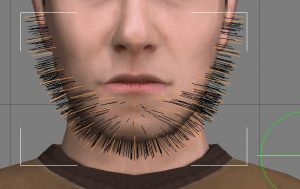
Step 10
It’s time to start tweaking the hair to represent proper beard around his face. Please follow the highlights showing in the image below.
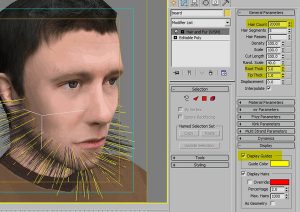
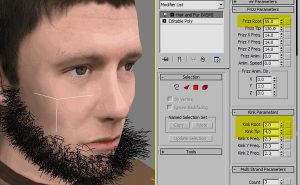
Step 11
Expand the “Material Parameters” and do the settings illustrated in the image below.
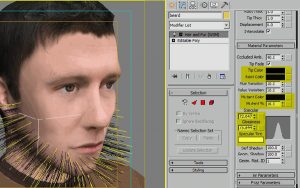
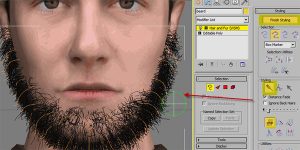
Step 12
You could see the hair length is a bit longer, let’s fix it. Expand the “Styling” tab and click on the button “finish styling”. Choose that scissor icon to cut out the extra hairs from his face. If you notice a green circle is available now, with that click on the tip of the hair to cut out as showing in the image below.
Step 13
After I cut out the extra hair around his face.
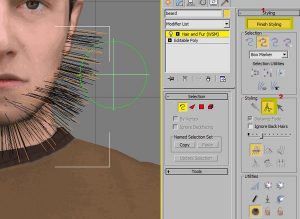
Step 14
To deactivate the styling again click on “Finish Styling” button to deactivate and also uncheck “display guides” as well as play with “percentage” and “Max. Hair” parameters.
Step 15
Expand “Multi Strand Parameters” and change the settings according to your suit.

Step 16
Expand “Fizz Parameters” and “Kink Parameters” and change the settings shown in the image below.
Step 17
Again activate “Finish Styling” button and brush down his beard to down bottom for make it looks like realistic.
Step 18
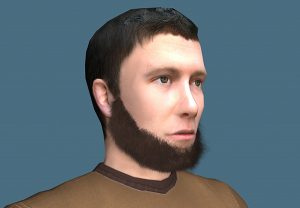
Deactivate brush styling and we are done, let’s have a test render. Here is my test render, play with the settings for get interesting results.


